Construction Tips
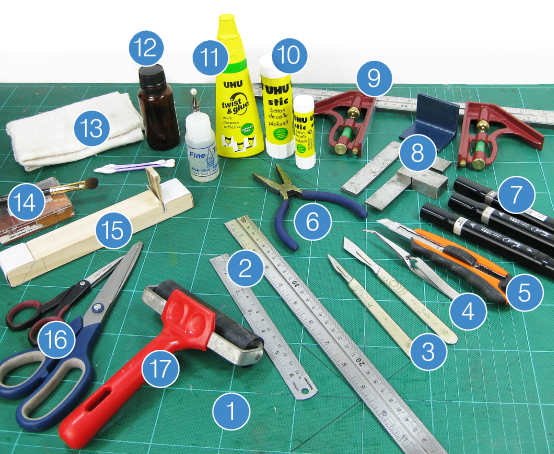
- Self-healing cutting mat
- Steel rulers (150mm & 300-400mm)
- Scalpel (No. 11 blade No. 3 handle and/or No. 25 blade No. 4 handle) or ‘X-Acto’ knife
- Tweezers
- Small ‘Snap off’ blade retractable knife
- Flat pilers (very quick way to snap off new retractable knife edges)
- Dual tip marker pens (Black and Warm Grey 9, 5 and 2 are very useful)
- Small engineers square or small section of angled steel.
- Two cheap combination squares mounted onto one ruler (a great way to hold elements square when gluing)
- Large and small glue sticks (ideal for applying printed sheets to card)
- All purpose clear or quick setting PVA adhesive in a fine point applicator bottle.
- Small jar of methylated spirit with cotton tips (great for dabbing away small spots of unwanted glue - test solvent on scrap print first!)
- Damp cloth (To wipe glue off fingers)
- Soft make-up brush and weathering powders
- Small sanding block (with fine sand paper to smooth rough edges)
- Scissors
- Rubber print makers roller or wallpaper roller

A quality matt photo paper (80-120gsm) or similar is recommended if using an inkjet printer. Lighter weight paper makes the job of wrapping the ‘Cover Layers’ prints around the ‘Base Layers’ or corners lot easier. Of course, if you printer is suitable then a good quality 80gsm copier paper will be fine.
Ensure that the paper hasn’t been affected by moisture, this can result in the prints taking on a green or purple hue, especially with inkjet printers.
The recommended card thicknesses are as follows:

Most card types are fine, 'mountboard' or 'pasteboard' are good, although cheaper 'grey board' is ideal for Scalescenes models.
Try your local art or office supply shop. If you don't have a supplier nearby, a number of good online suppliers are listed here.
![]() For mounting large areas, as unlikely as it seems we have found the best option by far is the humble glue stick (we use UHU).
For mounting large areas, as unlikely as it seems we have found the best option by far is the humble glue stick (we use UHU).
As long the backing card is given a generous but even coat of glue, not only do glue sticks not wrinkle or bubble, but the sheet can also be repositioned and smoothed for several minutes after application. We have also found the adhesive to have excellent longevity (unlike some spray adhesives).
Use a rubber roller or squeegee to ensure good adhesion to the card. An even all over coverage will avoid bubbles.
Using Self Adhesive Label Paper
Self adhesive label paper works well for the card mounted sheets but isn't particularly easy to work with when trying to wrap prints around 'Base layers'.
The longevity of the adhesive can be an issue with some label sheets.
Mount the sheets with the card 'grain'
If you card is not forming smooth curves or score lines, before mounting the sheets on to the card, check which way the card ‘grain’ is running. Generally all card and paper with roll smoothly in only one direction, I alway try design folds and score lines to run with the grain of most A4 sheets of paper (portrait), try to glue the sheets on to the card with the grains running the same way.
It is strongly recommended giving sheets several light even coats of artist's matt spray varnish (used to fix chalk and pastel drawings and available from most art supply shops). This helps protect the print surface during construction and reduces fading and discolouration. Always test the varnish on a scrap print before applying to your kit!
![]() The grey cut lines are designed to be cut down the centre, although in most cases they are not visible on the finished structure. Cut out the smaller elements on the sheet first, this ensures that the steel ruler is supported as you cut.
The grey cut lines are designed to be cut down the centre, although in most cases they are not visible on the finished structure. Cut out the smaller elements on the sheet first, this ensures that the steel ruler is supported as you cut.
Cutting tips
- As you are cutting, try to keep the blade at a shallow angle, this avoids a rough ‘ploughed’ edge either side of the cut.
- Use a small ‘Snap off’ blade retractable knife for cutting out the card mounted ‘Base layers’.
- Remember, snap off a new edge regularly (card blunts blades very quickly).
- Never apply excess pressure to the knife, it’s easier to cut through heavy card with several lighter slices rather than a single cut.
- Use a scalpel or ‘X-acto’ knife to cut out the ‘Print only’ ‘Cover layers’.
Cutting out window openings:
- Use a fresh scalpel or x-acto blade!
- Try to cut away from each corner, this avoids over cutting.
- For smooth edges always ensure the steel ruler is sitting over the frame side of the window openings.
Cutting longer curves:
- Cut on a large level cutting surface so you can rotate the job easily without obstruction.
- Use a sharp blade! Snap off a new blade every few cuts.
- Always work from 'inside' the curve (ie as though the blade is attached to a compass with you at the centre)
- Try to cut the full length of the curve, stopping and starting will produce 'kinks'. If you do have to stop mid curve, when you restart always backtrack along the existing cut.
Cutting circles and shorter curves
- Again, use a sharp blade!
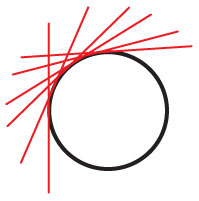
- The easiest way to cut out smaller circles is to use a series of straight slices that are tangential to the circle.

![]()
![]() For spot gluing or applying a thin beads of glue, use ‘all purpose’ clear (UHU - the solvent free in the green twist top bottle works well and doesn't string) or quick drying PVA adhesive. Use sparingly and keep a damp cloth handy to wipe glue off your fingers.
For spot gluing or applying a thin beads of glue, use ‘all purpose’ clear (UHU - the solvent free in the green twist top bottle works well and doesn't string) or quick drying PVA adhesive. Use sparingly and keep a damp cloth handy to wipe glue off your fingers.
For small elements, I recommend a fine tip glue applicator.
Apply weight or clamp to assist with adhesion if required. A good supply of cheap plastic mini-spring clamps are always good to have on hand. Gluing elements together on an old tile or sheet of glass works well to ensure that everything is flat.
 If gluing two larger card elements together, it sometimes helps to carefully introduce a slight curve. This helps to stop the card lifting at the edges as the glue sets.

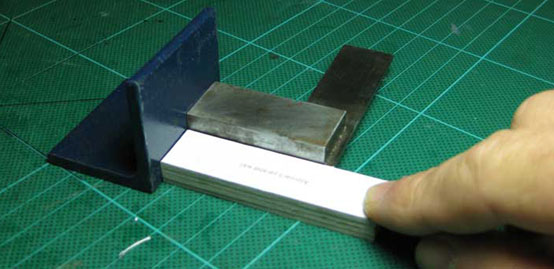
Use a couple of small engineers squares or small sections of angled steel to assist you with getting elements square.

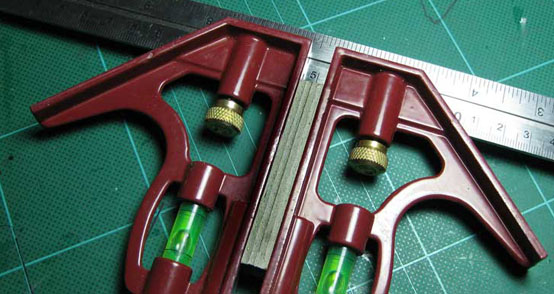
Another handy tool that is great for squarely clamping sections together is formed by combining two cheap combination squares onto one ruler. It also works extremely well to ensure walls are perpendicular.

![]()
![]() With the exception of smaller parts it is easier to fold elements before you cut them out. Crease each end of the fold first using the blue dashed lines as a guide and then work gently towards the middle.
With the exception of smaller parts it is easier to fold elements before you cut them out. Crease each end of the fold first using the blue dashed lines as a guide and then work gently towards the middle.
![]() Score all elements before you cut them out. Scoring involves dragging a knife VERY LIGHTLY along the surface of the sheet only just breaking the surface of the paper. Practice on a piece of scrap first.
Score all elements before you cut them out. Scoring involves dragging a knife VERY LIGHTLY along the surface of the sheet only just breaking the surface of the paper. Practice on a piece of scrap first.
![]()
Using a small piece of scrap card smear a thin even coat of glue along the overhanging flap and then gently fold it tightly around the edge of the card. Keep a damp cloth nearby to wipe off any glue from your fingers.
